Track AWS cloud costs using OpenCost
This guide will help you set up AWS Cost and Usage Reports (CUR) with OpenCost to track your AWS cloud costs in Port.
By default, OpenCost pulls on-demand asset prices from the public AWS pricing API.
The AWS Pricing API is limited in its resolution capabilities, not allowing per-resource costs analysis and deep granularity.
To allow for a more granular resolution of your AWS cost data, OpenCost supports ingesting pricing data from CUR reports.
In this guide, we will use the OpenCost price capabilities leveraging AWS CUR, and Port's Ocean OpenCost integration, to ingest per-resource cost entities into Port.
Common use cases
- Track cloud spending across different AWS services
- Monitor costs per team or project
- Create cost allocation reports
- Analyze cost trends over time
Prerequisites
-
An AWS account with the following permissions:
IAM Permissions (Click to expand)
{
    "Version": "2012-10-17",
    "Statement": [
        {
            "Effect": "Allow",
            "Action": [
                "organizations:DescribeOrganization"
            ],
            "Resource": "*"
        },
        {
            "Effect": "Allow",
            "Action": [
                "s3:GetBucketTagging",
                "s3:PutBucketTagging",
                "s3:GetBucketPolicy",
                "s3:PutBucketPolicy",
                "s3:ListBucket",
                "s3:CreateBucket"
            ],
            "Resource": "arn:aws:s3:::aws-map-cur-bucket-*"
        },
        {
            "Effect": "Allow",
            "Action": [
                "cur:PutReportDefinition",
                "cur:DeleteReportDefinition",
                "cur:DescribeReportDefinitions"
            ],
            "Resource": "arn:aws:cur:*:*:definition/map-migrated-report"
        },
        {
            "Effect": "Allow",
            "Action": "cur:DescribeReportDefinitions",
            "Resource": "*"
        }
    ]
} -
Set up OpenCost with AWS CUR using this guide.
This guide uses KubeCost documentation, but the steps are the same for setting up OpenCost.
Cost Report DelayAfter setting up AWS CUR, it may take up to 24 hours for the first cost report to be generated and available in OpenCost.
-
Install Port's OpenCost integration.
Set up data model
After installing Port's OpenCost integration, The OpenCost CloudCost blueprint will be created for you automatically.
This blueprint represents an OpenCost CloudCost entity. If the blueprint does not exist,
Follow these steps to add it:
-
Navigate to your Port organization's data model page.
-
Click on the
+ Blueprintbutton. -
Click on
Edit JSONbutton. -
Copy-paste the following blueprint JSON:
OpenCost CloudCost blueprint (Cick to expand)
{
  "identifier": "openCostCloudcost",
  "description": "This blueprint represents cloud cost allocations from your OpenCost instance",
  "title": "OpenCost CloudCost",
  "icon": "Opencost",
  "schema": {
    "properties": {
      "startDate": {
        "title": "Start Date",
        "type": "string",
        "format": "date-time"
      },
      "endDate": {
        "title": "End Date",
        "type": "string",
        "format": "date-time"
      },
      "listCost": {
        "title": "List Cost",
        "type": "number"
      },
      "netCost": {
        "title": "Net Cost",
        "type": "number"
      },
      "amortizedNetCost": {
        "title": "Amortized Net Cost",
        "type": "number"
      },
      "invoicedCost": {
        "title": "Invoiced Cost",
        "type": "number"
      },
      "amortizedCost": {
        "title": "Amortized Cost",
        "type": "number"
      }
    },
    "required": []
  },
  "mirrorProperties": {},
  "calculationProperties": {},
  "aggregationProperties": {},
  "relations": {}
} -
Cick on
Save.
Add mapping configuration
Now that we have defined our data model, let us update the OpenCost mapping configuration to ingest the relevant cost data in Port. OpenCost cloudcost data supports a variety of time windows, aggregations and filters.
In this guide, the data that will be ingested is the cost of all AmazonEC2 resources in the past week.
If you installed the OpenCost integration, a cloudcost config block was added automatically - in this case, replace the pre-existing config.
If you haven't installed the integration and only created the blueprint, add the following YAML snippet as your cloudcost configuration:
Follow these steps to update the OpenCost mapping configuration:
-
Navigate to your datasources page, and click on the
OpenCostdatasource. -
Add the following configuration to your datasource mapping:
OpenCost CloudCost mapping configuration (Click to expand)
- kind: cloudcost
    selector:
    query: .properties.providerID
    aggregate: providerID
    accumulate: week
    window: week
    filter: service:"AmazonEC2"
    port:
    entity:
        mappings:
        identifier: .properties.providerID
        title: .properties.providerID
        blueprint: '"openCostCloudcost"'
        properties:
            startDate: .window.start
            endDate: .window.end
            listCost: .listCost.cost
            netCost: .netCost.cost
            amortizedNetCost: .amortizedNetCost.cost
            invoicedCost: .invoicedCost.cost
            amortizedCost: .amortizedCost.cost
Service selectorThe
.selector.filter.servicefield is required, and represents the AWS service type (AWS Namespace) we want to ingest.We use the
.properties.providerIDfield to get the ARN of the AWS resource. Some AWS resources do not have a full ARN as their ID and are ingested as regular IDs.For example, an entity which represents an EC2 instance will be ingested to Port with
i-abc123abc123abas its identifier. -
Click on
Save & Resync. -
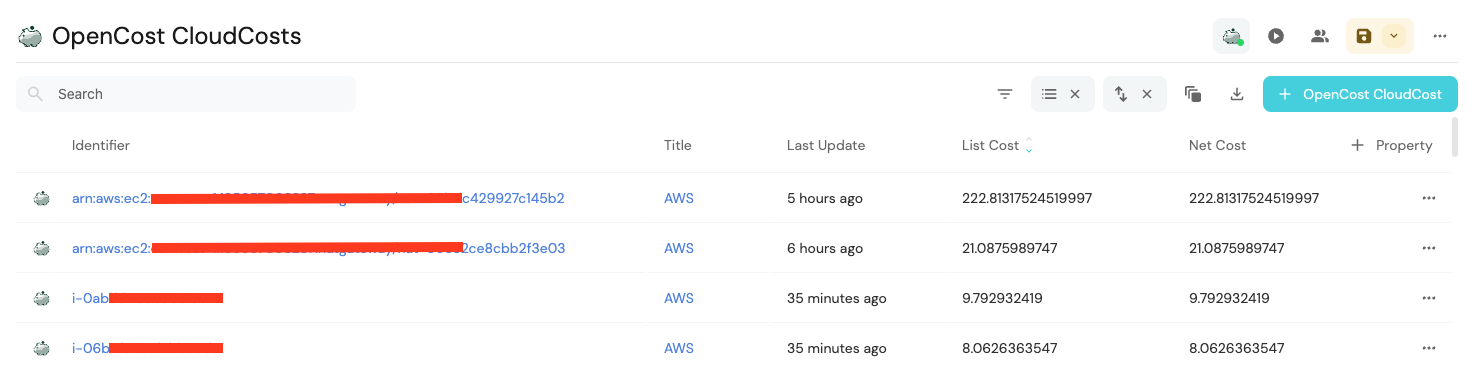
Now, navigate to your OpenCost CloudCost entities page, and you should see your
AmazonEC2resources, and their different price types.
Conclusion
Using Port Ocean's OpenCost integration, we have successfully ingested AWS resources' cost data into our Port organization!